

Older Revision of Macro Photography with What You Got
Revision: 20071210_050839 | All Revisions
Macro Photography with What You Got
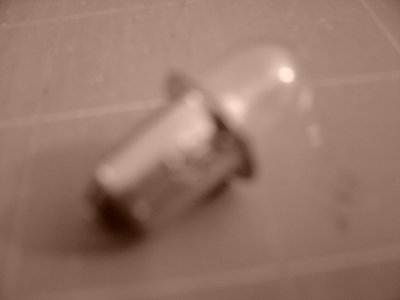
I've noticed a lot of blurry photos on the web, such as the example photo below. Most of these photos are of small objects, where the photographer is trying to capture details of the subject to show others. Say, an eBay auction, or a technical question regarding a particular device. Even though most readers can kind of make out the subject in the blurry photo, these kind of photos really takes away from the communication.
The best thing to do, of course, is to spend a lot of money at buying an expensive DSLR camera with a specialized macro lens. Not only is that a lot of money, but some photographers is simply trying to capture a macro photo a single time to communicate with their peers. In this article, I will show you techniques of capturing macro photos of everyday objects in a sharp presentable fashion, using equipment that you already have.
Step 1: Turn on Macro Mode
Most digital cameras have a macro mode. It is usually represented by the flower symbol. If you haven't noticed it on your camera before, it might be time to read over the user's manual once again. Before you shoot any macro photo, always check to see if you camera has this macro functionality and turn it on! The macro mode allows your digital camera to focus much closer than you normally could.
Even if your digital camera doesn't support the macro mode, you can still capture small objects. Continue reading.
Step 2: Get as Close as You Can Without Blurring the Photo
Now you are ready to shoot the photograph. Move your digital camera toward the object. Use the auto-focus functionality to focus on the small object. Usually that's in the center of the image. If your camera can't achieve focus, that means your digital camera is too close to the object. Move the digital camera back and try again. Continue this process until you find that your digital camera can lock focus on the object. That is probably the closest your camera can be. When your camera's auto-focus can lock-on the object, your photo will be clear and sharp.
Try the widest zoom angle. Then try the telephoto zoom angle. Some digital cameras can focus really close to the object at the widest angle, while other digital cameras can focus really close at the telephoto angle. Most consumer digital cameras usually provides the macro focus at the wide end. But you'll never really know unless you give it a try, or unless you read the specification of your camera carefully.
Step 3: Shoot the Macro Photo
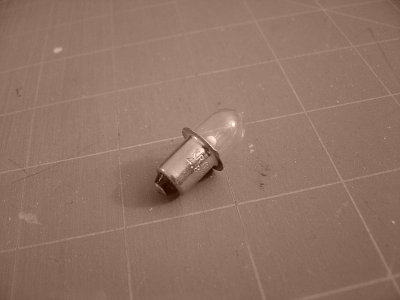
At the closest focus distance, snap the photo. Make sure that the auto-focus has locked-on to the object so that the photo is clear and sharp. Don't worry about extra spaces around the object that you are capturing; in the next step, we'll deal with the extra space. The important part is to capture a clear and sharp photo. The photo below is an example of a clear and sharp light bulb with a lot of extra space.
Step 4: Crop the Photo
If you were able to fill the entire image frame with the object you are capturing, then you don't need to crop the photo at all. But if the image has a lot of extra space that distracts from the object you are trying to portray, you should crop the photo down to the size of the object. You can do that with the photo software that came with your camera. Or you can download a free photo editing software like Gimp (see "Related Links" section below).
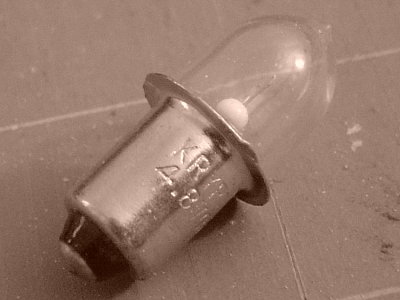
After cropping the photo to size, you'll have a presentable photo to post and communicate with (see photo below).
713 Users Online
|
Get Our
$10000-above $5000-$9999 $2000-$4999 $1000-$1999 $500-$999 $200-$499 $100-$199 $50-$99 $25-$49 $0-$24 Gift Certificate 
|
|