
![]() Attach
|
Attach
|
![]() Edit
|
Edit
|
![]() Revisions
Revisions
![]() Related Content
Related Content
What can you do with RAW that you can't do with JPEG?
Shooting RAW take up so much space on your digital camera. And for most place--online and offline--JPEG is the de facto standard. So why shoot RAW? Why not just shoot JPEG?
One reason, JPEG is a lossy format, RAW is a lossless format. This topic is covered in our "Shoot JPEG or TIFF?" article and our "Shoot in RAW, Always!" article. So I won't go into details about it in this article.
In this article, I want to show you the power of RAW in real-life examples, rather than abstract theories. This way, you get a real taste of why you'd want to shoot RAW all the time--or, at least, both RAW and JPEG at the same time.
Ove-Exposed Photos
RAW image contains everything that the digital camera sensor sees at the time you clicked the shutter button--the "raw" data. JPEG, on the other hand, is post-processed from the "raw" data. Therefore, once the JPEG image has been produced, the extra data in the RAW image are gone. So how can the extra "raw" data be useful? Let's take a look at the following over-exposed example.
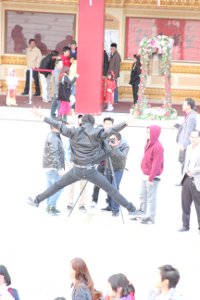
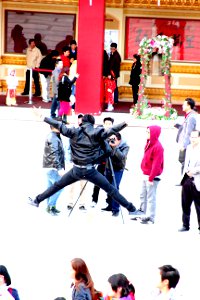
The photo above, on the left, is the over-exposed image captured in JPEG format. It's an impromptu shoot with spot-metering turned on. The spot-metering measured the black leather jacket, therefore, causing the over-exposure. The photo above, on the right, is the best I can do to salvage it in Gimp. I applied a lot of negative brightness and increased contrast. Note that the jumping jack's hands are gone. The shoes are barely even there. The floor is completely washed away, creating a disconnect within the scene. I am sure some of you can do a better salvage job than me, but I doubt anyone can produce an "useable" image from the over-exposure.
Luckily, I captured both RAW and JPEG at the same time on my Canon EOS Rebel T3i. Now, let's see what we can produce from the RAW image of this exact same over-exposed image. I have UFRaw installed on my computer. So double-clicking the CR2 (RAW) file my digital camera produced will bring up UFRaw, which will best guess the optimal processing for the RAW image. The photo below, on the left, is the default processing by UFRaw.
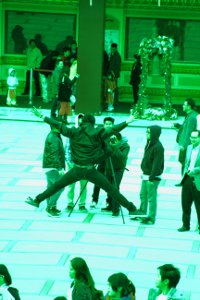
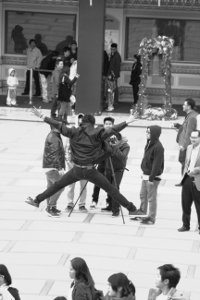
Wow. Can you believe it? The default processing produces an extremely "useable" photograph. You can clearly see the discernible shapes. The hands are there. The shoes are intact. And the floor looks great. Ok, the image is green! But there is an one click operation that could fix that... black and white (grayscale) as shown above in the photo on the right. Without doing very much work, we now have a very good and very impromptu action shot.
In this article, I'm showing you the power and the ease of getting an "useable" shot with RAW image. The fact is that you can play with the RAW processing settings to your hearts content. You can change the color to remove the green. You can use the brightness and color curve features to make the image even more appealing. So play away until you get a great photograph out of the "raw" data.
Related Links
![]() Attach
|
Attach
|
![]() Edit
|
Edit
|
![]() Revisions
Revisions
![]() Related Content
Related Content
Attachments
- Over-Exposed JPEG with Brightness and Contrast Correction.JPG (36 KB)
- Over-Exposed JPEG.JPG (29 KB)
- UFRaw Default Process.jpg (71 KB)
- UFRaw Green Image Fixed by Grayscale.jpg (65 KB)
267 Users Online
|
Get Our
$10000-above $5000-$9999 $2000-$4999 $1000-$1999 $500-$999 $200-$499 $100-$199 $50-$99 $25-$49 $0-$24 Gift Certificate 
|
|


