
Older Revision of How to Use GPSLogger to Track Photo Locations
Revision: 20130524_163335 | All Revisions
How to Use GPSLogger to Track Photo Locations
As we wrote about in "The Joy of GeoTagging Your Photos" article, it's quite fun, exciting, and memorable to keep track of where your photos are taken. A handful of digital camera have built-in GPS today. Many high-end SmartPhones, such as Android and iPhone, already does it on every photo taken with its build-in camera. However, don't fret if your digital camera doesn't have this feature, because you can track your GPS locations with time and synchronize your photo with them later.
You can track your location and time with many external GPS on the market. However, in this article, we are going to focus on using your Android phone with the free GPSLogger app. This is a winning combination, because most of us already carry our phone with us 24/7. And the SmartPhone's time is always sync'ed correctly with the network time. Why not use our capable phone, rather than carry another external device?
This article explains how to track your GPS location. Once you have this data, read the following articles to add location to your images:
Installing GPSLogger
GPSLogger is available for free on Google Play. See "Related Links" below for a direct link on Google Play to install on your Android phone.
Running GPSLogger
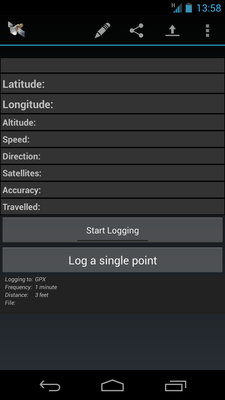
A quick tap on the GPSLogger app on your Android phone yield the following entry point. But don't be too quick to tap on "Start Logging". The default setting probably isn't sufficient for your needs. It took me a day to figure out how to log correctly. And this article will show you how to set it up right the first time.
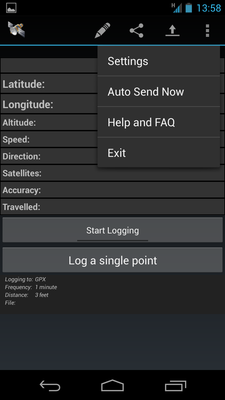
Use the menu button to open up the pop-up menu options. You need to select "Settings" to set up logging (see screen shot below).
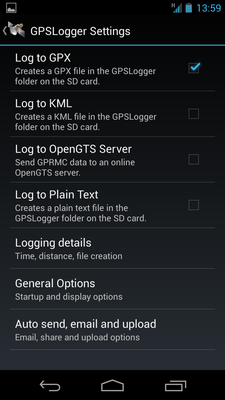
The sheer number of settings in this app may overwhelm you. But don't worry, this article will walk you through it.
If you are planning to use GPSLogger with the free Geotag software as we will document on this web site, then select the "Log to GPX" option. Geotag works directly with the GPX format.
Next, select the "Logging details". This selection presents more menu options. We will need to make some more changes here.
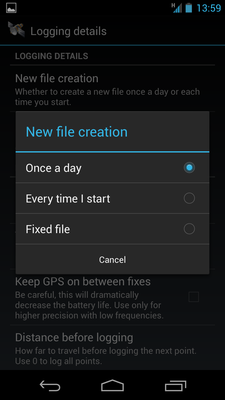
Select "New file creation" settings. It will present you with three choices, see screen shot below: 1) Once a day; 2) Every time I start; 3) Fixed file. We tend to organize our photos by days. Therefore, we find the "Once a day" option to be the best pick. However, if you are more organized and would like to create a new file manually using the "Start Logging" button, select the second choice.
We really can't recommend the third option, because it's for advanced users who want to keep everything in one giant file. The only time we can think of selecting option 3 is if you want the entire multi-day trip all logged to the same file. Now if you know what you are doing, then by all means, selection choice three.
We suggest you disable "Prefer celltowers". It's supposely saves battery power, but is less accurate. We find that with the settings we are showing you in this article, we are able to keep the GPSLogging on for an entire day without running out of battery. Therefore, for our photo tagging purpose, it's better to have accuracy over saving battery.
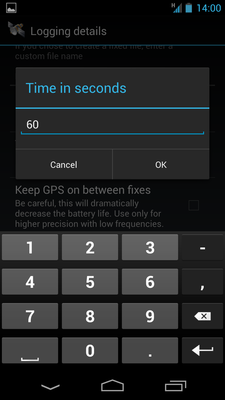
Select "Time before logging" setting. This setting helps GPSLogger determine how often to log. We feel 60 seconds is appropriate, because it's unlikely you will travel a great distance in 60 seconds.
Disable "Keep GPS on between fixes". For our purpose, there is really no reason to keep the GPS on at all times.
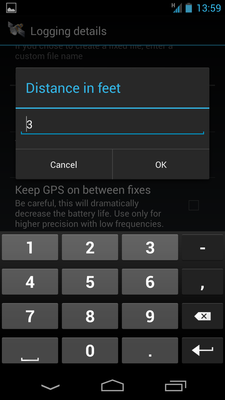
Next, select the "Distance before logging" setting. This option allows you to decide how far you travel before GPSLogger add a data point to the log file. It keeps your log file from growing if your phone is just sitting in the same place. We find that setting it to 3 feet seems to make sense as shown in screen shot below.
Select "Accuracy before logging" setting. This setting helps GPSLogger determine whether to log a data point it is is not sure of its accuracy. The default is set to 16 feet.
The first day we used GPSLogger, we find that the default value is completely unreasonable, because GPSLogger didn't log a single point of data. It turned out that we never got an accuracy better than that. Our accuracy averaged 33 feet. Because we are tagging photos and not for scientific study, there is really no reason to limit our accuracy. Therefore, we recommend you set the value to zero to log all points as shown in screen shot below.

When you are done with the settings, press the back botton to go back to the previous menu page. Now select "General Options". The phone will present you more options like the following screen shot. The settings on this page isn't very important. We recommend you use the same settings that shows below.
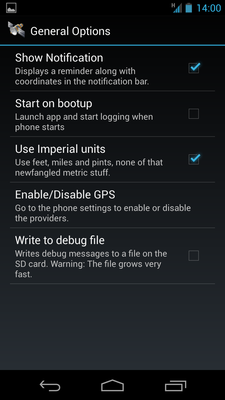
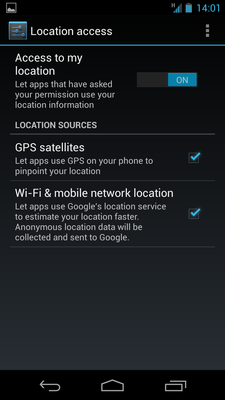
Tap the "Enable/Disable GPS" menu option. This action actually takes you to the Android setting page (outside of GPSLogger). But it's very important that you enable GPS on your phone. Or GPSLogger won't be able to track your location. Use the same settings that is shown in the screen shot below.
Once you have set-up GPSLogger and your phone in the manner shown in this article, you are ready to track your location. Go back to the main screen and tap the "Start Logging" button. GPSLogger will continue to log even if you switch to other apps.
Transferring Your GPS Log
After logging your location for the day, you are ready to synchronize your location to your photos. But before you can do that, you have to transfer the GPX file to your computer.
GPSLogger has a number of "auto send" options. However, we are not going to cover that in this article. The reason is because it doesn't seem to have the option to automatically delete log files after sending it. The method we show in this section requires manual sending, but allows you "clean" up at the same time.
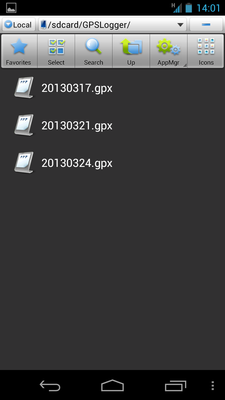
Before you can send your file, you need to know the location of your logs. The log is in "/sdcard/GPSLogger", named by date. You can see the files with any file manager app. The screen shot below shows the log files with ES File Manager (a free file manager you can download on Google Play).
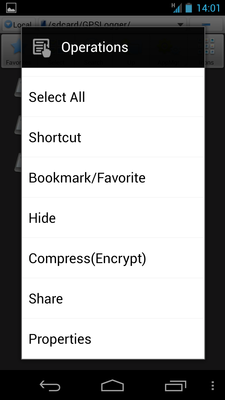
There are many ways to transfer your log files to your computer. We like the simple sharing method with the default Gmail app. In ES File Manager, you can tap and hold the log file to bring up menu options (see screen shot below). Choose the "Share" option.
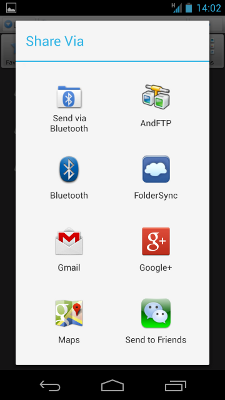
The "Share" option will bring up a number of apps that can "share" the GPX log file. Choose "Gmail" and Android will automatically attach the GPX log file to a new e-amil message. Just send the e-mail message to yourself. Then you can download the file on your computer via your e-mail.
Related Links
479 Users Online
|
Get Our
$10000-above $5000-$9999 $2000-$4999 $1000-$1999 $500-$999 $200-$499 $100-$199 $50-$99 $25-$49 $0-$24 Gift Certificate 
|
|