

![]() Add Comment
|
Add Comment
|
![]() Related Links
|
Related Links
|
![]() TrackBack
TrackBack
![]() Related Content
Related Content
Quick Tape Changing Adapter
Quick change:
I built this custom adapter seen below to change tapes while maintaining tripod mount. It lifts the camera 7/8 of an inch above the tripod mount face. The camera looses some stability when using this adapter. The camera tends to want to unscrew and pan left, especially when cables are connected. When I transported the camera while it was attached to the tripod with this adapter I tore out the mount nut from the bottom of the camera, so remember to remove it for transport.
The adapter is constructed from a red plastic bottle cap, threaded rod, a 1/4"20 nut and a threaded barrel. The hardest piece to find was the threaded barrel which is commonly used in trophy construction, this will fit on the tripod head screw. Cut the head off of a bolt or cut some threaded rod to 3/4"long. I used vice grips to intentionally damage the threads so that they bind up in the barrel and then pinched the barrel once assembled to secure the binding. Alternatively assemble it with epoxy. Now you have a simple extension that will raise the camera enough to eject and load tapes.
I added a flared 1/4"20 nut to tighten and secure the adapter to the camera and keep the adapter from damaging the camera by going in too deep.
Removing the adapter was difficult until I added a piece of round plastic tightened down with another nut to provide enough grip to twist it on and off. It is still difficult to remove from the camera,so use a washer where the adapter threads into the camera, and carry pliers along.
At the dollar store I noticed a tiny table top tripod that was too lightweight to support the TRV-350 but the plastic nut was just the right size to improve stability at the tripod attachment point on the camera.
Although I have used that cheap tripod to support the camera in a pinch, the ball joint will tighten up with just barely enough friction to hold this camera up.
When I'm recording in studio, I use an auxiliary recorder for extended recording duration.
For camera mode I remove the tape and remember to turn off DEMO Mode in the setup menu.
Remove the tape from the camera so the camera will not shut itself off after five minutes.
Turn off demo mode so the camera doesn't think it's being sold after five minutes powered on.
The Sony RDRVX-515 or RDR VX-530 combo VHS/DVD burner I connect to has a DV connector that I connect to the firewire port on the camera. I can achieve superb quality DVD recordings in the HQ (1hour), HSP (hour&1/2), & SP (2hour) modes. LSP(2.5), LP(3), EP(4), SLP(6) & SEP(8hour) record in diminishing quality trading time for higher compression on a 4.6 GB DVD+R disk.
For a quick simple connection, alternatively one could power up by rotating the switch all the way up to memory mode. This looses some functionality like super night shot, 16:9 format, picture effects and digital effects.
Also the A/V jack will connect up to just about any Video Cassette Recorder for longer duration taping. And there is no reason you couldn't record in camera while recording with the VCR at the same time. Just remember to blank display information. Use the button on the remote or on the control panel behind the LCD for all displays, or use the V-OUT/LCD set to LCD in the menu under ECTothers/display. This is the lowest quality video connection so use S-Video if available to improve the image.
If you don't need to reposition the camera during the shoot then there are alternative mounting method which will allow you clearance to change the tape. I have used a six foot threaded rod jammed into the ground, a furniture clamp that instead of holding wood together while it dries overnight clamps the camera to a pole or door-frame. I have even used a short section of threaded rod epoxied into the end of a very large walking stick as a monopod and stabilizer, although this limits it's use as a walking stick because it tends to shock and jar the camera too much. I even mounted a tube that may have been a rear glass lifter from a mini-van vertically into a tabletop, on top it is 1/4"20 threaded rod and on bottom it incorporates a matching nut crimped into the tube. I found it in the gutter, so I don't know exactly what it was for, it reminds me of a section of swiffer handle. I have even used, in a pinch, a bent wood handle cane jammed into the handstrap as a stabilizer and monopod, which seemed to work pretty well - even when zoomed in tight with no steadycam in 16:9 frame.
Trade-off - Wildly versatile camera functionality over changing tapes every half hour with a tripod in the way.
In the image below:
Upper left- custom built adapter.
Upper right-dollar store tripod.
Lower left- knurled 1/4" 20 nut from security camera mount.
Attached Image: 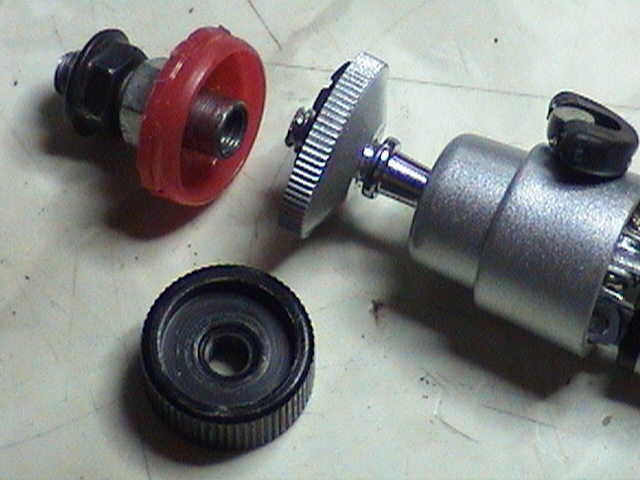
dsc00918.jpg
Disney Wizard
Fri, 07 Dec 2007 22:33:57 +0000
![]() Add Comment
|
Add Comment
|
![]() Related Links
|
Related Links
|
![]() TrackBack
TrackBack
![]() Related Content
Related Content
Did your message disappear? Read the Forums FAQ.
Add Comment
Spam Control | * indicates required field
TrackBack
TrackBack only accepted from WebSite-X Suite web sites. Do not submit TrackBacks from other sites.
Send Ping |
TrackBack URL |
No TrackBacks yet. TrackBack can be used to link this thread to your weblog, or link your weblog to this thread. In addition, TrackBack can be used as a form of remote commenting. Rather than posting the comment directly on this thread, you can posts it on your own weblog. Then have your weblog sends a TrackBack ping to the TrackBack URL, so that your post would show up here.
Messages, files, and images copyright by respective owners.
352 Users Online

$10000-above $5000-$9999 $2000-$4999 $1000-$1999 $500-$999 $200-$499 $100-$199 $50-$99 $25-$49 $0-$24 Gift Certificate 
|
|